Sunday, December 20, 2015

Simple Cascade cards for Christmas

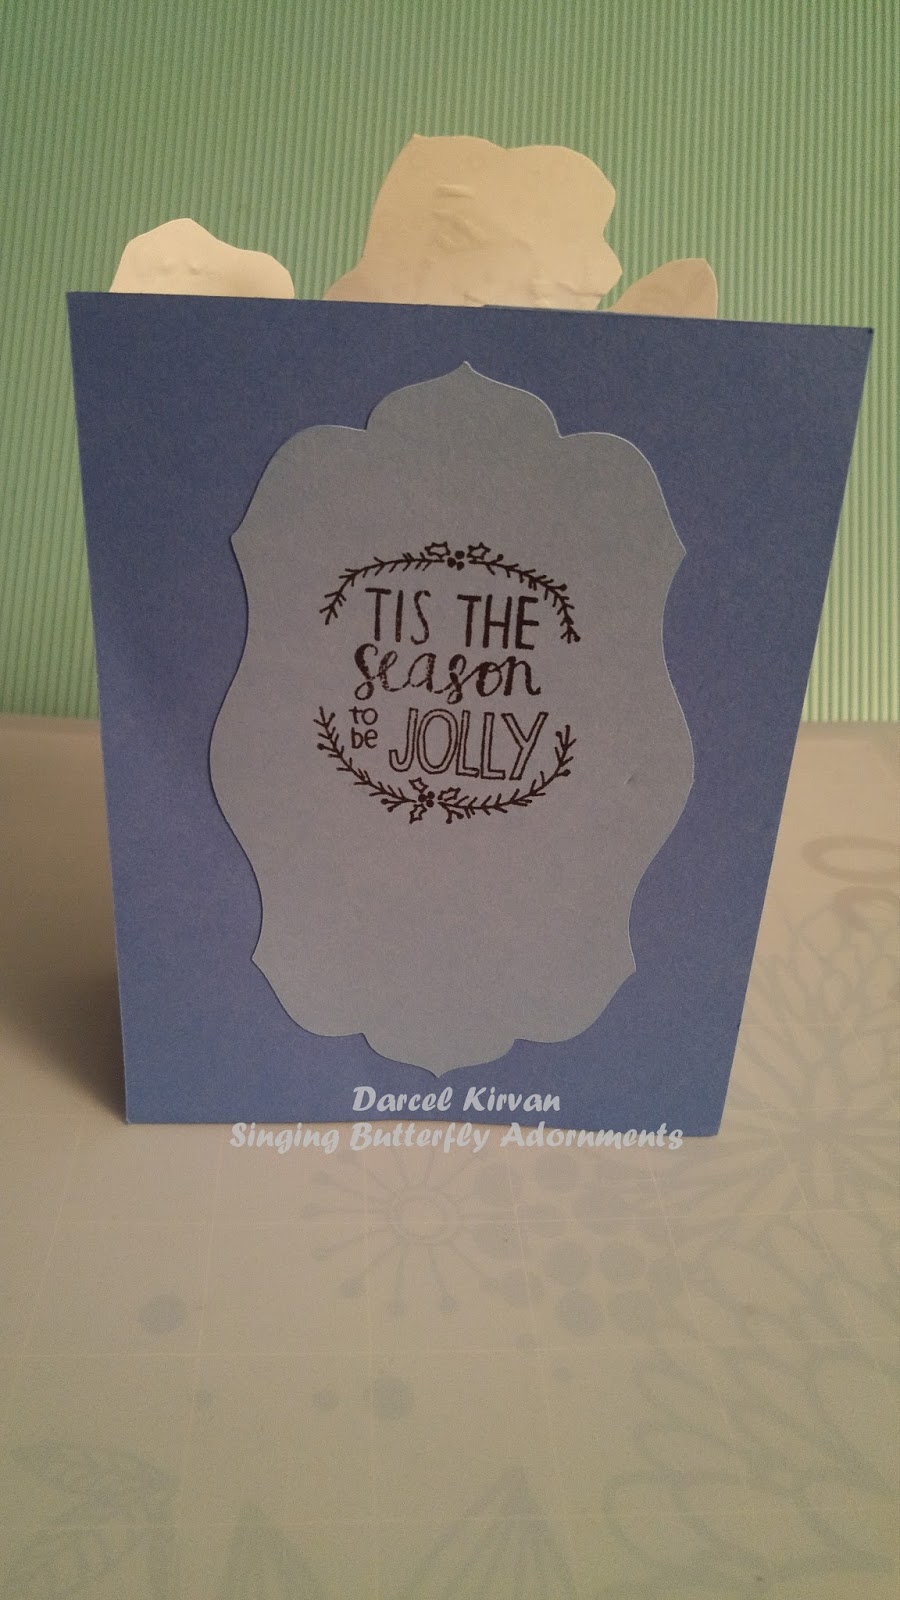
Stamp set: Flakey Friends C1506


Supplies Needd:
-        -    Scoring board & tool               
-    - Paper – cardstock or double sided patterned paper (8.5 x 11 or 12 x12)
-         -  Paper cutter    
-    - Scissors        
     - Ruler             
     - Pencil & eraser

Additional Supplies: 
- stamps, inks, die cuts, embellishments, papers to decorate your card
-adhesive                    
- border punches

Cascade/Concertina Technique – Simple
1.  Cut one piece of cardstock/patterned paper into two pieces measuring 5 ½” x 8 ½”.  These will be used for the accordion/folded part of the card.

2.  Cut one piece of cardstock/paper 5 ½” x 4 ¼” for the back of the card.

3.  Score the two pieces of 5 ½” x 8 ½” cardstock/paper at the following intervals: 2 1/8”, 4 1/4 ” and 6 3/8”. (Three even pieces divided every 2 1/8”.)

4.  Place the top edge of the 2 1/8” score line at the edge of the cutting channel of your paper trimmer.  Hold that end of the paper there while angling the remaining paper 2” past the cutting channel.  Cut the paper at that angle.  Repeat for the other piece.  (If you want a less severe angle, position the paper 1” beyond the cutting channel.  This will give you a look like the card in the images below.)

5.  Fold the two pieces of cardstock on the scored lines.  Start with a valley fold, followed by a mountain fold, followed by another valley fold. The paper should look like a zigzag. Do the same for the other piece. 


6.  Take one folded piece and adhere it to the back piece (5 1/2" x 4 1/4").  Line up the bottom and left side with the outer edges of the back piece, making sure that the fold is to the inside.

Repeat this step but in reverse.  The edge of the folded piece should be matched up to the right edge of the back.  Make sure the folded edges are butted up against each other with no gaps in the middle.


7.  Cut a piece of paper to adhere to the front of the card.  This can be in any shape or size that you want.  If you plan to put a stamped image on it, stamp the paper before adhering to the card. This piece will hold the two sides of the fold together.


8.  Decorate your card as desired with stamped images, die cuts, embellishments and ribbons.

Note: The card will not open like a traditional greeting card.  The sentiment that usually goes on the inside should appear on the back of the card.


Extra Step
9.  If you want to decorate the panels of your card with coloured or patterned cardstock, cut pieces that are 2” in width, leaving the length variable.  Measure these pieces against your card base to determine the length required for each piece.

10.  Fancy edges can be added to the top of the card by cutting border pieces using a die cut machine or border punch.
   

Alternative:
During step six, have the folds facing inwards to make a card like this:

Stamp set: Wintry Wishes C1560


Wednesday, October 28, 2015

Layout inspirations

Sketches are a great source of inspiration. The Close to my Heart Idea Books are not only catalogues, but also great sources of inspiration..

The following layout was inspired by Atlantic Hearts Sketch #129 and the layout on page of 102 of the Close to my Heart 2015/16 Annual Idea Book.


I am working on a scrapbook about my European vacation this past summer. I have combined the CTMH Wanderful and Laughing Lola paper collections to get more variety in the book.  The number of overlapping colours between the two collections is fantastic! Flaxen matches the Laughing Lola gold and Thistle is a close match to the Laughing Lola purple.

The inspirations:


Monday, October 19, 2015

Bokeh Stamping Technique - three ways

This technique allows you to imitate a photographic light technique (out of focus dots of light) using paper and ink.

Warning: This technique can be messy.  If so desired, you can use disposable gloves to keep your hands clean.


Supplies Needed:

All Bokeh Techniques
-          White pigment ink
-          Circle stencils of various sizes
-          Sponge daubers
-          Card bases, papers and other accessories to complete your cards

Dry Technique
-          White cardstock
-          2-4 ink pads of various colours
-          Stamping/crafting sponges

Wet Technique
-          White cardstock or watercolour paper
-          2-4 re-inker colours
-          One spray pen for each ink colour (or spray bottles)
-          Masking tape
-          Suggested: craft heater
-          Alternate: can use baby wipe technique (baby wipes, dish/base) or watercolour paints

Step #1 – Create a background
Using one of the techniques, cover a piece of white cardstock or watercolour paper to create a soft, multi-coloured background. Make sure the ink or colour is completely dry before moving on to step #2.

Dry Technique: Using ink
Bokeh Technique - Dry

1.                   Press the sponge or dauber in the ink colour of your choice.

2.                   Sponge randomly on your cardstock.  It helps to move your sponge or
                dauber in a circular motion.

3.            Add a second and/or third colour using the same technique. 
               
*For more visual interest, you can overlap the colours as you are inking.*

4.                   Completely fill in the cardstock – do not leave any white areas.

TIP:  Try inking with a sponge on scrap paper first.  Try using different pressures and sponge areas to create different looks.  Different types of sponges will give different looks as well. Also, if using pigment inks, the colours will blend more like paint than the dye inks.


Wet Technique: Using re-inkers
*** WARNING: This technique is VERY messy and wet. 
Be sure to place a mat or disposable cover beneath your work.***

1.       Cut a piece of cardstock or watercolour paper to the size that you wish to 
work with.

2.       Put masking tape around all of the edges, taping this piece down to a matt 
or scrap paper.  The masking tape helps in three ways: a) helps reduce curling of 
the paper when it is wet, b) helps prevent water or liquid from escaping from the 
area you are working on and c) it helps to keep your surface stable so that it 
doesn’t move while you are inking it.

3.       Mix 3 drops of re-inker with 10 drops of water.  (Use a painting tray or 
individual containers for each colour or spray pens.)  Do this for all of the colours 
that you wish to use for your background.

4.       Wet the paper down first using a paintbrush, sponge or waterbrush.

5.       Using a paintbrush, sponge or waterbrush, randomly spread the various ink 
colours around on your paper until there is no white paper showing.  You can 
overlap colours to create new colour combinations. OR If using spray pens, 
alternate spraying the various colours until the page is covered with ink.

6.       Leave this paper to dry overnight or dry it with a craft heater.

Fold a baby or wet wipe in half and then in half again.  Or for a larger stamping 
area, fold the wipe in thirds.  (You want at least 2-3 layers for the ink to soak 
through.)

Alternates:
1.     BABY WIPE TECHNIQUE - You can use the baby wipe technique (placing drops of re-inker on baby wipe to create a multi-coloured “stamp pad”) but instead of using stamps use a sponge. Create your background as with the techniques above.
2.      
  
      WATERCOLOUR PAINTS – You can use watercolour paints to paint a background using brushes or sponges. TIP: Watercolours always look darker when wet.


Step #2 – Bokeh Technique

WARNING: Be sure that your background is dry before beginning this step otherwise your background will smear and you will get colours on your white ink pad.

HINT: To see what the Bokeh photography technique looks like check out page 14 in the Holiday Expressions 2015/16 catalogue.  The Christmas tree in the background is an example of this photographic technique.

1.    1.      Place a circle stencil down on top of your background. 

       2. Press your sponge dauber in the white ink.  Press the dauber down into the stencil hole and fill the circle with ink.  Don’t just press down, move the dauber around.  The white ink is very wet and paint like, so you can drag the ink around.

       3.  Using different sizes of circles, fill the background with as many white circles as you think appropriate.  In this case, more is better. 
4.       
      Remember to start with a light amount of pressure.  You can always add more ink later.  Be sure to use different amounts of pressure for different circles to change the intensity of the white ink.
5.       
      Be sure to clean your stencil periodically so as not to smudge unwanted ink on your project.
6.       
       4.  Overlapping circles and having partial circles that run off the page edge also help to create a more authentic look.
7.       
       5.  For the smallest circles, just press your dauber directly onto the paper.  These small circles will appear as the brightest points of light.  (It helps to not just press the dauber down, but also to rotate your finger a bit inside the dauber.)


TIPS: - You can create your own stencils from cardstock or acetate using dye cutting machines.
-         
      This technique can be done with shapes other than circles eg: hearts, snowflakes etc.

Step #3 – Card Assembly
1.       After the bokeh white circles have dried, cut a piece of the bokeh patterned cardstock or paper into the size and shape desired to decorate your card.
2.     
          Adhere the piece to your card base.
3.    
         Decorate your card as desired.

Suggested videos:
This technique is hard to pick up just reading about it.  Try these videos:

1.       Watercolour technique using reinkers:   https://www.youtube.com/watch?v=1hnLvIDciSE
2.       Watercolour/wet technique: https://www.youtube.com/watch?v=ghp6-Ga4wIA
3.       Dry ink technique with sponges/daubers: https://www.youtube.com/watch?v=VtrB1FvcqhU

Wet technique (re-inkers and spray pens)
CTMH Stamp: September 2015 SOTM - Paper Garden and Say It All Hostess Rewards Stamp 

Dry technique
CTMH Stamp: Fallen Leaves D1492 & 


Dry technique sample
CTMH stamp set: C1559


Baby Wipe & Bokeh Techniques combined
CTMH Stamp set - Birthday Wish C1624

Sunday, August 30, 2015

Atlantic Hearts Sketch Challenge # 122 - Wanderful travel layout

I was searching for a new way to get me creating more often so I thought I'd try out the Atlantic Hearts Sketch Challenge.

This week's challenge is #122


http://atlanticheartschallenge.blogspot.ca


I have just started working on my scrapbook for the trip of a lifetime that my husband and I took to Mediterranean Europe this summer.  This sketch worked wonderfully to create a two page layout for this album.


Supplies Used: (all from Close to my Heart)

Cardstock:  Black, Colonial White, Gypsy, Flaxen, Crystal Blue

Patterned Paper: Wanderful

Die cuts/titles: Artistry (CTMH Cricut)

Right hand page

Close up of die cuts on right hand page

Left hand page

Close up of title made using Artistry cartridge

Thursday, August 20, 2015

Sneak Peak of the Annual Inspirations 2015-16

Welcome to the Brae-er Team Blog Hop! 

This month we want to give you a preview of products from the 
new Annual Inspirations Idea Book 2015-16.

If you have come from Tamara's blog, then you're on the right track.  
If not, this is a circular blog and you can pick up anywhere and see all of the posts.


Inspiration is essential in any art form from painting to papercrafting and it is a fundamental quality of Close to my Heart products from the exciting papers to the beautiful ink colours.  With each new Idea Book, we are introduced to new sources of creativity.  I don’t know about you, but I feel like it’s Christmas and I’m sneaking a peak at my presents when I get to page through a new catalogue.  I make my wish list and can’t wait to buy all my new favourites.  

This month you also get a sneak peak of the new Annual Inspirations 2015-16 through the Zoe line of papers, accessories and Workshop on the Go kit. (All of which are currently available for purchase and will remain so until the end of August 2016.)
Figuring out what to make this month was quite easy.  I started with the Zoe paper and accessories, along with my chosen photos. In need of inspiration and speed, I turned to the How-To Foundation line of books.  With seven photos (six horizontal and one vertical), I turned to the “Easy Inspiration” layout in the Cherish book (found on pages 106-107).  It was a perfect fit for my photograph requirements, plus a great chance to use multiple papers and patterns from the new Zoe papers.


Supplies:
PAPER:
-          Zoe paper pack (X7197B) 
           Glacier cardstock (X5770)
-          White Daisy cardstock (1385)
ACCESSORIES:
-          Coral shimmer trim (Z3088) - currently available in the Zoe WOTG kit
-          Zoe assortment (Z3082)
-          Zoe complements (X7197C)
-          Black enamel stars (retired item)
HOW-TO BOOKS:
-          Cherish Scrapbook Program (9038)
-    STAMPS:
-          Handwritten Print (E1030)
INKS:
-          Sorbet (Z2164)
-          Sweet Leaf (Z2153)


Card Series
This series of cards uses the paper and colours of the Zoe paper pack and is inspired by the Wishes Card Confidence book.


 Card #1 – “Collage”
Collage design on page 97 – Wishes Card Confidence Program


Stamps Used: - “Thinking of You” from August Stamp of the Month: Framed (S1508)
-          Flower from September Stamp of the Month: Paper Garden (S1509)

Card #2 – “Card 3”
Card 3 design on page 23 -  Wishes Card Confidence Program


Stamps Used: 
- “For You” from August Stamp of the Month: Framed (S1508)
- Flower from September Stamp of the Month: Paper Garden (S1509)

Card #3 – “Card 3”
Card 3 design on page 23 -  Wishes Card Confidence Program


Stamps Used:
 - “Thinking of You” from Have a Happy Day (D1616)
-   Flower from September Stamp of the Month: Paper Garden (S1509)

Card #4 – Pinterest inspired
This card takes its inspiration from another source: Pinterest. The colours are inspired by the Zoe paper colours.


Stamps Used: 
- “Thinking of You” from Seaside Greetings (D1609)
-   Flowers from September Stamp of the Month: Paper Garden (S1509)


August 2015 SOTM - Framed (S1508)

September 2015 SOTM - Paper Garden (S1509)


Supplies:
PAPER:
-          Zoe paper pack (X7197B)
       Glacier cardstock (X5770)
-          White Daisy cardstock (1385)
ACCESSORIES:
-          Coral shimmer trim (Z3088)
HOW-TO BOOKS:
-          Wishes Card Confidence Program (9041)
STAMPS:
-          August Stamp of the Month: Framed (S1508)
-          September Stamp of the Month: Paper Garden (S1509)
-          Seaside Greetings (D1609)
-          Have a Happy Day (D1616)
INKS:
-          Sorbet (Z2164)
-          Sweet Leaf (Z2153)
-          Canary (Z2643)
-          Black (Z2105)


Benefits of the CMTH How-To Publications
-         -  Inspiration for proven effective scrapbook layouts (or card designs)
-          - Each sketch or design provides basic information: number of photos used, cut sizes             and layout
-          - Diagrams and instructions are easy to read and follow
-          - Offers suggestions for changing the photo numbers and sizes for other possibilities               using the same sketch
-          - Ease of use – can search sketches by number of photos used
-          - Great for beginners to teach the basics
-          - Great for experienced crafters to add to their repertoire
-          - Endless possibilities - each sketch design can be rotated or combined with other                   sketches to create new looks and options
-          - Layouts don’t limit your own personal creativity
-          - Many of the books also teach stamping or papercrafting techniques
-          - Quick, easy and beautiful layouts that can be used over and over again


Cherish (9038)


Wishes (9041)
        
For more information on any of these Close to my Heart products, 
contact your CTMH consultant,
or check out my website at kwregion.ctmh.com.

Now check out the next blog in our hop: Heather Steeves.